
The sun hadn’t even fully cleared the horizon, and I was already standing in the hallway of our old house, clutching a cold cup of coffee and engaging in a high-stakes negotiation with a four-year-old over the necessity of wearing socks. Sarah was hiding under the dining room table, Maya was insisting that she could only eat cereal if it was served in a blue bowl that was currently in the dishwasher, and baby Leo was practicing his lung capacity in the playpen. My voice was reaching that sharp, frantic pitch that usually signals a looming parental meltdown. I was tired of being a human alarm clock, a drill sergeant, and a professional nag all before 7:00 AM.
Power struggles aren’t a sign of bad parenting; they are a sign of a child trying to exert autonomy without a roadmap. When we bark orders like “Brush your teeth!” or “Put on your shoes!”, we are inviting a “No.” It’s a natural reflex. I realized back then that if I wanted my kids to cooperate, I had to stop being the boss and start being the architect of their environment. By moving the “authority” from my mouth to a visual chart, I took the target off my back. Suddenly, it wasn’t Mom telling them what to do; it was The Chart.
Establishing a morning and evening rhythm isn’t about creating robots. It’s about creating safety through predictability. When a child can see what comes next, their nervous system relaxes. They stop fighting the transition because the transition is expected. Here are nine DIY visual routine charts that saved my sanity while raising Sarah, Maya, and Leo, along with the hard-won lessons I picked up along the way.
1. The Clothespin Flip Chart for Tangible Success
I’m a huge fan of things kids can actually touch and move. The Clothespin Flip Chart is my top recommendation for toddlers and preschoolers because it provides immediate physical feedback. You take a simple piece of sturdy cardboard or a wooden slat and divide it into two sections: “To Do” and “Done.” You write the tasks on wooden clothespins—or better yet, glue a small picture of the task to the pin—and clip them all to the “To Do” side.
As Leo moved through his morning, he would physically unclip the “Dress” pin and move it to the “Done” side. There is something incredibly satisfying for a small child about that “click” sound and the physical movement of an object. It builds a sense of mastery that a sticker on a paper just can’t match. I’ve found that using bright colors for the “Done” side—maybe a cheerful green—makes the progress feel like a celebration rather than a chore.
Don’t overcomplicate this. You don’t need a fancy laminator or professional graphic design skills. Hand-drawn stick figures work perfectly fine. In fact, Maya used to love it when I drew her with “crazy hair” for the “Brush Hair” pin. It added a bit of levity to a task she usually hated. If you make the chart too precious, you’ll be afraid to change it as they grow, and flexibility is the name of the game in parenting.
The beauty of the clothespin system is its portability. If you’re traveling to Grandma’s house for the weekend, you can toss the slat and the pins into a bag. The routine stays the same even if the zip code changes. This consistency is the secret sauce to preventing those “vacation meltdowns” we all dread. It tells the child that the world is still a predictable place, even if they are sleeping in a different bed.
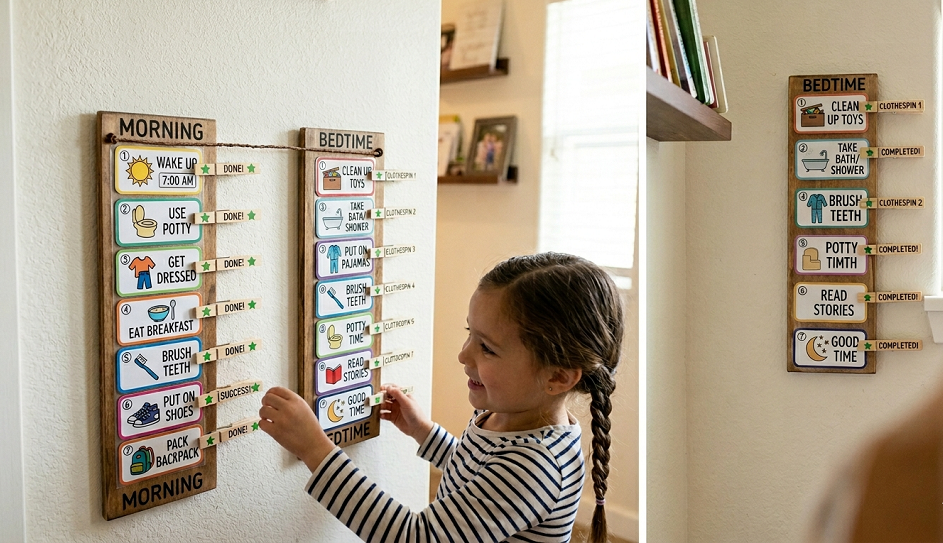
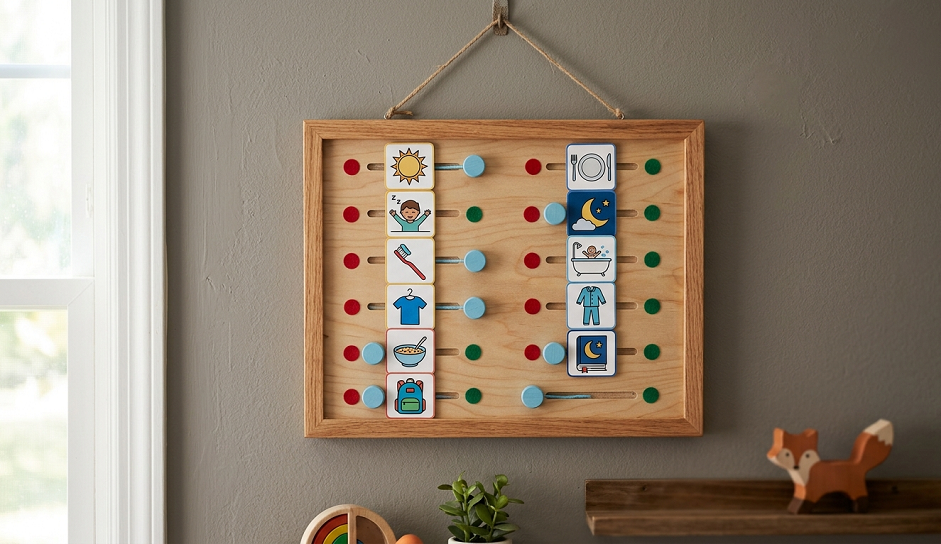
2. Interactive Velcro Sequence Boards for Visual Learners

Velcro boards are the gold standard in my house for a reason. I spent a whole Saturday afternoon once creating a custom Velcro board for Sarah when she started kindergarten. We used a long strip of felt and laminated squares of paper with icons for “Make Bed,” “Pack Backpack,” and “Put on Shoes.” The “hook and loop” action is addictive for kids, and it keeps them engaged with the board longer than a static list would.
I’ve found that a horizontal layout works best for morning routines to simulate a timeline, while a vertical layout is better for bedtime to signify “winding down” toward sleep. For the bedtime version, we started at the top with “Bath” and ended at the bottom with “Lights Out.” It creates a visual descent that mimics the body’s natural slowing down process. If you try to mix the two or make the board too cluttered, the child will just get overwhelmed and ignore it entirely.
One trick I learned the hard way: don’t put more than five tasks on a board for a child under the age of six. Anything more than that feels like an insurmountable mountain. If they have ten things to do, break it into two boards. Give them a “Part 1” and a “Part 2.” Let them feel the win of finishing the first board before moving to the next. Success breeds success, and a child who feels capable is a child who is less likely to scream about putting on their coat.
I’m of the opinion that you should let your kids help pick the icons. If Maya wanted the icon for “Brush Teeth” to be a picture of a hippopotamus with giant pearly whites, we used the hippo. Ownership is the enemy of resistance. When a child helps build the tool, they are much more likely to use the tool without you having to point at it fourteen times.
3. The “Checklist Under Glass” (Dry Erase Frame)
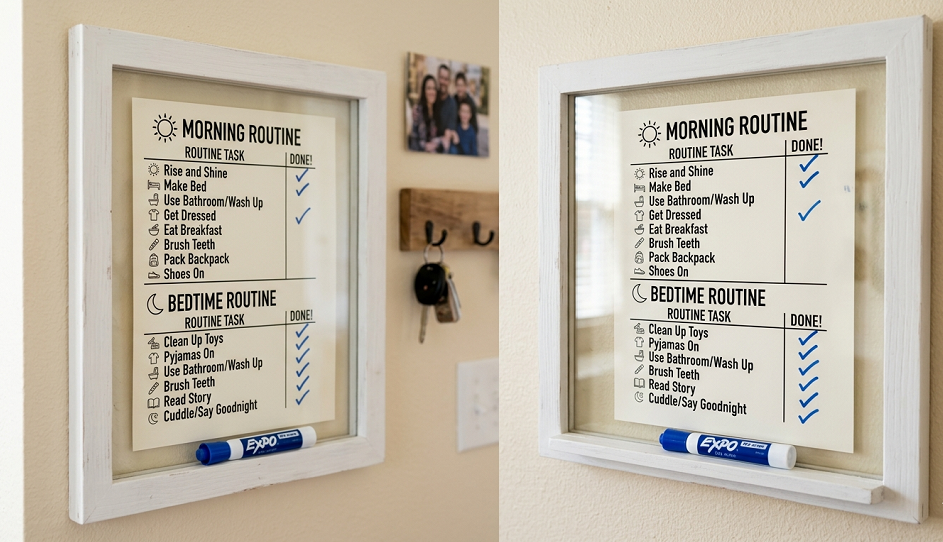
This is the “grown-up” version of a routine chart, and it’s what we transitioned to as the kids hit their middle school years. You take a beautiful 8×10 photo frame, put a piece of decorative paper or a printed list inside, and put the glass back on. Your child then uses a dry-erase marker to check off boxes directly on the glass. It looks like “decor” rather than a “chore chart,” which matters deeply to a pre-teen who is starting to value their room’s aesthetic.
I’ve found that this works wonders for the “forgotten” tasks that drive parents crazy—things like “Refill Water Bottle” or “Put Gym Bag by the Door.” For Leo, we kept his dry-erase frame right by the light switch. He couldn’t leave the room without seeing it. It became a silent prompt. I stopped saying, “Did you check your bag?” and started saying, “Check your frame!” It shifted the responsibility from my brain to his, which is the ultimate goal of parenting.
I will tell you right now: do not buy the cheap markers. Get the good ones that actually erase cleanly. Nothing kills the motivation to use a chart faster than a smudgy, dirty-looking glass surface. Also, make sure the “Check” part is the very last thing they do. There’s a psychological “dopamine hit” that comes with checking that final box, and you want that to happen right before they head out the door or hop into bed.
If you have multiple kids, let them choose different frame styles. Sarah wanted a sleek, modern black frame, while Maya wanted something vintage and ornate. These small choices give them a sense of control over their lives. In a world where they are told when to eat, where to sit, and what to learn, having control over how their “To Do” list looks is a big deal.
4. The Magnetic “Flip-Up” Cookie Sheet Method
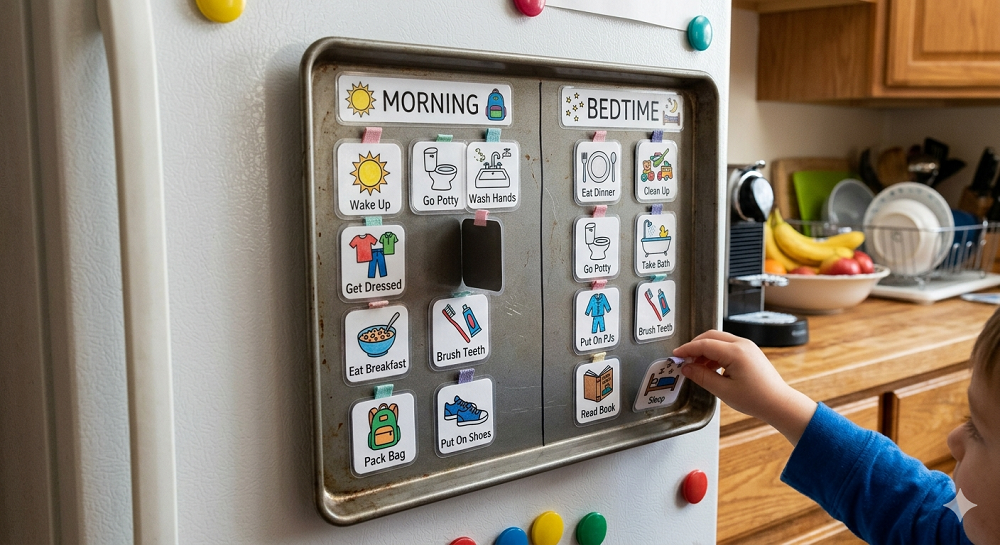
If you have a spare cookie sheet and some magnets, you have a powerhouse routine builder. You can find magnetic tape at any craft store and glue it to the back of small “task cards.” When the task is done, the child flips the card over to reveal a “Good Job!” message or a gold star on the back. It’s simple, it’s cheap, and it’s incredibly effective because of the “hidden” element.
I used this specifically for bedtime struggles. The “mystery” of what was on the back of the card kept Leo interested. Sometimes I’d hide a tiny drawing of a dinosaur or a smiley face. It turned a transition that used to be filled with tears into a game. If you can turn a power struggle into a game, you have already won 90% of the battle. The cookie sheet can be mounted on the wall with Command strips or just kept on a nightstand.
I’ve discovered that the cookie sheet method is particularly good for kids with ADHD or sensory processing needs. The “clink” of the magnet against the metal is a strong sensory anchor. It helps ground them in the moment. When Sarah was struggling with focus, that physical “clink” helped her brain register that one task was over and it was time to move to the next. It’s a transition cue that doesn’t involve a parent’s voice.
One thing to avoid: don’t use too many magnets. If the sheet is covered in 20 different icons, it just becomes visual noise. Stick to the “Big Rocks”—the non-negotiables. You don’t need a magnet for “Breathe” or “Walk to the Bathroom.” Focus on the points where the friction usually happens, like putting on pajamas or finishing homework.
5. The “Photo Flow” String for Toddlers
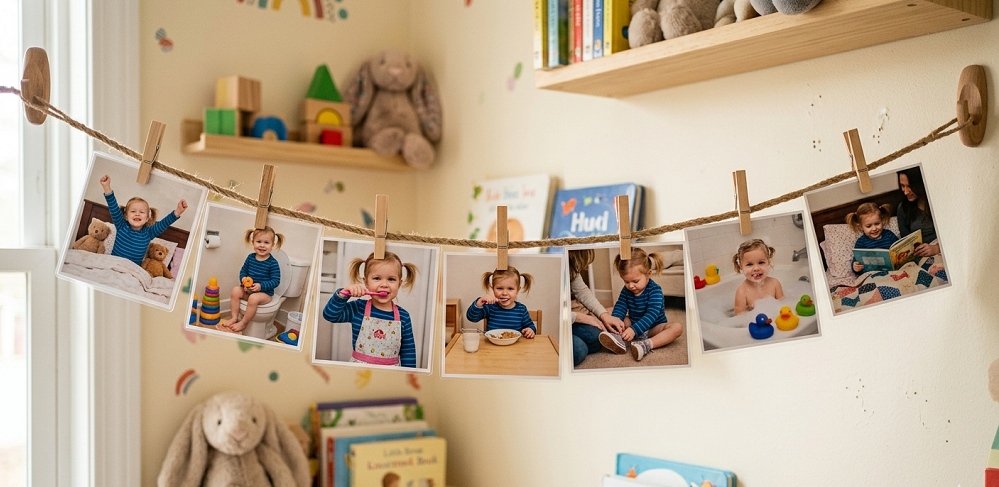
Before a child can read, they need pictures—specifically, pictures of themselves. I spent one morning following Maya around with a camera, taking photos of her doing her routine. Photo of Maya brushing teeth. Photo of Maya putting on her shoes. Photo of Maya sitting at the table. We printed these out, clipped them to a piece of twine with mini-clothespins, and hung it at her eye level.
This is, in my opinion, the most powerful way to build a routine for a very young child. Seeing their own face performing the task makes it feel attainable. It’s not a command from an adult; it’s a reflection of their own capability. When Maya would stall, I’d just point to the string and say, “Oh, look at Maya in the picture! What is she doing there?” She would look, giggle, and then go do the task.
I’ve found that you should keep the string short—maybe four or five photos max. If it stretches across the whole room, it loses its impact. Also, make sure the background of the photos is clean. If the “Brush Teeth” photo has a background of a messy bathroom, the child might get distracted by the clutter. Keep the focus entirely on the action.
Side note: This is a great way to handle the “Separation Anxiety” that often hits during the morning rush. You can include a final photo of a “Big Hug” or “Mommy coming back” to show them that the routine ends with a positive connection. It bridges the gap between the chaos of getting ready and the emotional weight of saying goodbye at daycare or school.
6. The “Clock Color-Block” for Older Kids
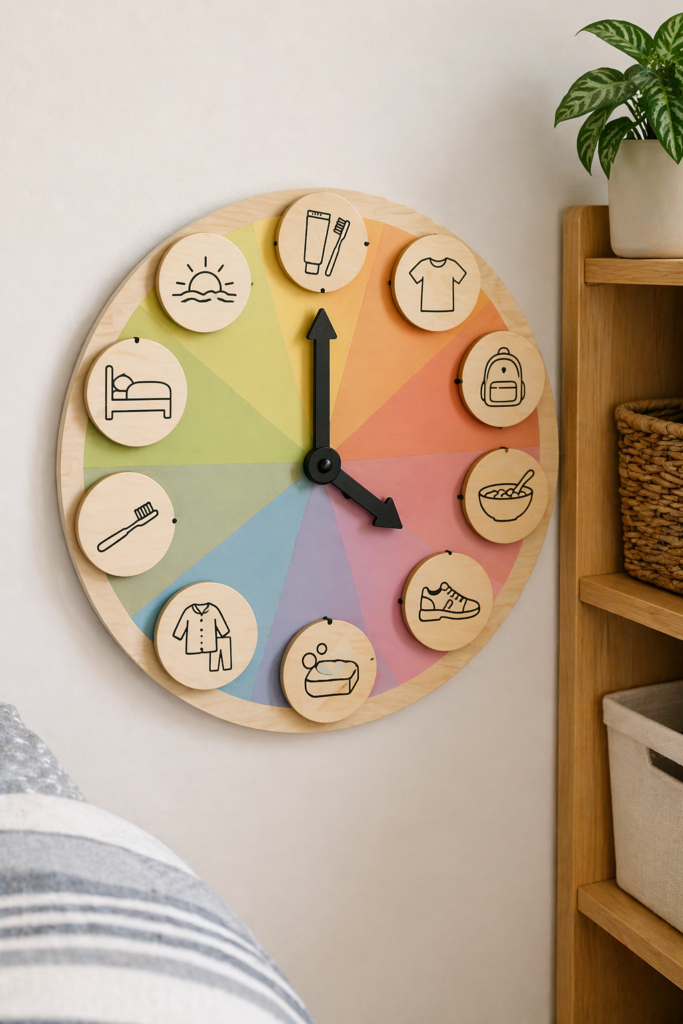
When Sarah and Maya reached the age where they were learning to tell time, I modified a cheap analog wall clock. I used colored Sharpies to shade in segments of the clock face. The “Blue” segment from 7:00 to 7:15 was breakfast. The “Yellow” segment from 7:15 to 7:30 was getting dressed. This teaches the concept of time duration, which is a skill most kids (and some adults!) sorely lack.
I’ve found that “time blindness” is a major cause of morning power struggles. Kids don’t realize that playing with Legos for “five minutes” has actually turned into twenty. The color-blocked clock gives them a visual representation of how much time they have left. Instead of me yelling, “Five minutes until we leave!”, I could say, “We leave when the big hand hits the end of the yellow slice.”
This method is a total waste of time if you don’t use an analog clock. Digital clocks are too abstract for this purpose. The circular nature of an analog clock mirrors the “cycle” of a routine. It shows that time is a resource that is being used up. For Leo, who was always my “dawdler,” this was a game-changer. He could see the “Red” section (putting on shoes) getting closer and closer, and it naturally prompted him to speed up.
One tip: Don’t make the segments too tight. Always build in a five-minute “buffer” zone. I called this the “Oopsie Zone” in our house. It was the white space on the clock where nothing was scheduled. It allowed for the inevitable spilled milk or the lost shoe. Without a buffer, one small hiccup ruins the entire morning, and then everyone is stressed.
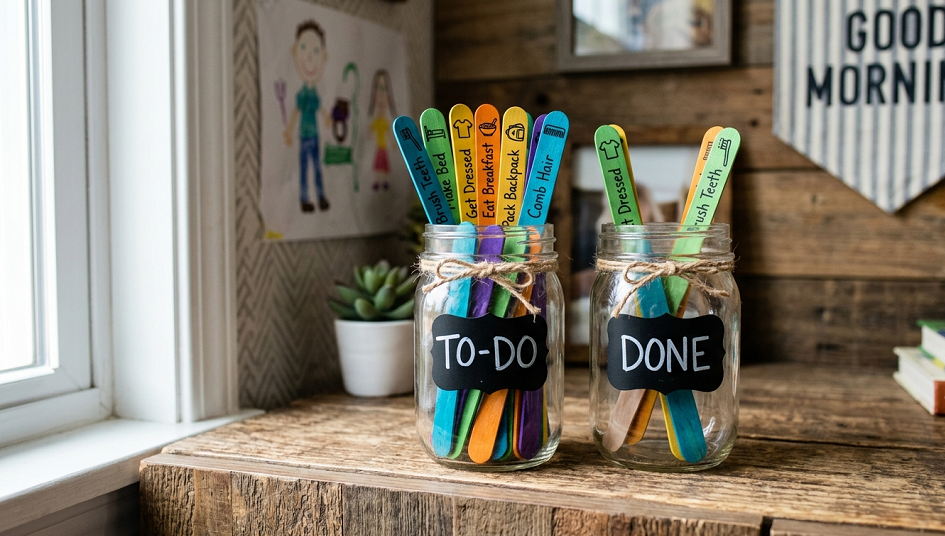
7. The “Popsicle Stick Jar” (The “To-Do” vs. “Done” Jars)

This is perhaps the simplest DIY on the list, but don’t let the simplicity fool you. You need two mason jars and a handful of popsicle sticks. Write one task on each stick. All the sticks start in the “To-Do” jar. As the child finishes a task, they move the stick to the “Done” jar. I liked to paint the tips of the “Done” sticks gold so they looked like little trophies as they filled up the second jar.
I’ve discovered that this works exceptionally well for bedtime routines that tend to “creep.” You know the ones—the “one more glass of water,” “one more story,” “one more hug” requests. If it’s not on a popsicle stick, it’s not part of the routine tonight. It sets a very firm, visual boundary on what the evening entails. Leo used to try to negotiate for extra sticks, but the rule was “The jars don’t lie.”
If you find your child is rushing through tasks just to move the sticks, you might need to add a “Quality Control” step. I’d tell the kids, “I have to ‘sign off’ on the stick before it moves.” This meant I’d do a quick check to see if the teeth were actually brushed or if the pajamas were right-side out. It kept the routine from becoming a race to the finish line.
I prefer this over a paper list because it’s interactive. There’s a weight to the sticks. There’s a sound when they hit the bottom of the glass jar. These small sensory details matter more than we think. It makes the intangible concept of “responsibility” feel like something they can hold in their hands.
8. The “Slide Chart” (The Ultimate Road Trip Companion)
The slide chart is a bit more “engineered,” but it’s fantastic for kids who like gadgets. You can buy these pre-made or make one using a piece of cardstock with “windows” cut out. Behind the windows is a sliding strip of paper. When the task is incomplete, the window shows a red “X.” When the child slides the strip, it changes to a green “Check.”
I’ve found that this is the best option for the car. If you have a long commute to school, or if you’re doing the “school run” with multiple stops, the slide chart keeps the kids focused on what they need to do once they arrive. “Do you have your lunch? Slide the tab. Do you have your library book? Slide the tab.” It turns the morning commute into a mission briefing.
Don’t use this for complex tasks. It’s best for “Yes/No” items. If a task has multiple steps (like “Clean your room”), a slide chart will just frustrate them because they can’t show partial progress. Use it for the “Final Check” items that usually get forgotten in the rush to the car. I’ve discovered the hard way that a “Check” that stays checked is better than a list that gets lost under the passenger seat.
Sarah loved her slide chart because it felt “official.” She’d hold it like a clipboard and check off her siblings’ tasks too (which, admittedly, sometimes led to a different kind of power struggle, but at least they were engaged!). It gives the child a role to play in the family’s success.
9. The Door-Hanger “Exit List”
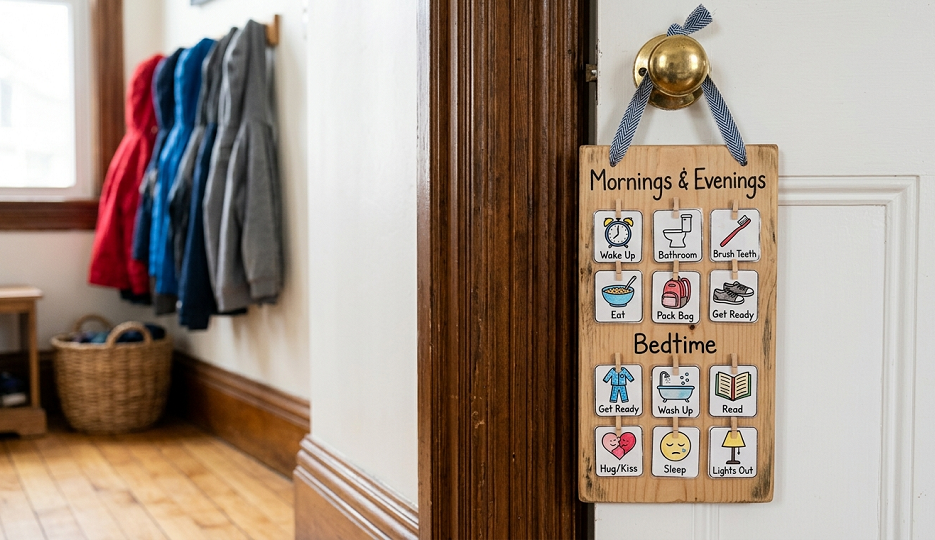
This is a bonus quick side note for those of you with “forgetters.” I created a simple door hanger—much like the “Do Not Disturb” signs in hotels—and hung it on the back of the front door. On it were four things: Shoes, Water, Lunch, Smile. It was the very last visual check before they stepped out into the world.
I didn’t make this a “chore.” I made it a “gatekeeper.” We couldn’t open the door until everyone had verified their “Exit List.” It became a ritual. It took the stress out of that final thirty seconds when you’re usually checking your watch and wondering why you’re always late. If the list was clear, the door opened.
You can customize these for each child’s specific “weak point.” Maya always forgot her flute for band, so her door hanger had a giant picture of a flute. Leo always forgot his jacket, so his had a coat icon. It’s a specialized tool for a specific problem. It’s not about the whole morning; it’s just about the exit.
The “Real Talk”: What Can Go Wrong
I’m going to be very honest with you: no chart is a magic wand. There will be days when the chart is ignored, days when the magnets end up under the fridge, and days when you want to throw the clothespins out the window. That’s okay. The chart is a tool, not a master. If you find yourself screaming at your child to “LOOK AT THE CHART!” you’ve missed the point. You’ve just replaced one power struggle with another.
The biggest mistake I see parents make is “Chart Fatigue.” You set up a beautiful system, it works for two weeks, and then it becomes part of the wallpaper. Your child stops seeing it because it never changes. I’ve discovered that you have to “refresh” the chart every month or so. Change the colors, swap out the stickers, or move it to a different wall. Keep it novel.
Another trap is making the chart a “reward” system rather than a “routine” system. I’m a firm believer that you shouldn’t give prizes for things like brushing teeth or putting on pants. Those are basic life skills. If you tie every magnet flip to a piece of candy or a screen-time token, the child will only cooperate if there’s a payoff. The goal is to build intrinsic motivation—the feeling of “I am a person who gets ready in the morning.”
Finally, don’t use the chart as a weapon. “You didn’t flip your magnet, so no dessert!” is a great way to make your child hate the chart. Use it as a supportive guide. If they miss a step, say, “Oh, I see the ‘Shoes’ pin is still on the ‘To-Do’ side. Do you need help with your laces, or are you doing it yourself?” Give them the “choice” within the framework of the routine. It keeps their dignity intact.
Parting Wisdom
Raising Sarah, Maya, and Leo taught me that parenting is less about control and more about connection. These charts aren’t about forcing your kids to “behave”; they are about reducing the friction in your relationship so you have more room for the good stuff. When you aren’t spending forty minutes arguing about socks, you actually have time to talk about their dreams, their fears, or the cool bug they found in the yard.
The morning sets the tone for the whole day, and the bedtime routine sets the tone for their sleep. You are giving them the gift of a calm, predictable start and end to their day. That is a massive win, even if the house still feels a little chaotic sometimes. You aren’t failing—you’re just learning how to build the right scaffolding for your family.
Which of these DIY charts do you think would work best for your “dawdler”? Or do you have a trick that has worked in your house? Share your thoughts and questions in the comment box below—I’d love to hear from you!