

Raising Sarah, Maya, and Leo taught me that a bored toddler is a creative demolition expert. I remember a Tuesday afternoon when Leo, then barely two, decided that the texture of mashed peas was better suited for the living room wallpaper than his stomach. I was exhausted, nursing a cold cup of coffee, and realized that my kids didn’t need more toys—they needed to touch the world without me saying “no” every five seconds. That was the day I cleared a space on the hallway wall and started my first DIY sensory project.
Sensory walls aren’t just about keeping little hands busy so you can finally fold the laundry. They are about autonomy. When we give a toddler a dedicated space to poke, pull, and scratch, we’re honoring their developmental need to explore. I’ve built a dozen versions of these over the years, and while some were legendary successes, others were “what was I thinking?” moments that ended in a lot of hot glue removal. Here are 13 ideas that actually hold up to the rigors of toddlerhood.
1. The Ultimate Fidget Board for Fine Motor Skills
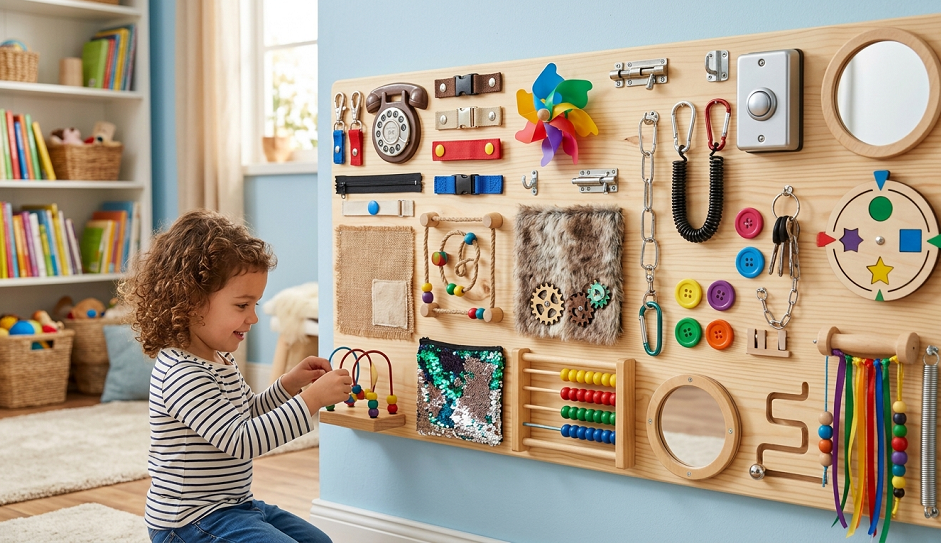
When Sarah was small, she was obsessed with my keychain. I spent half my life digging keys out from behind the sofa. I realized she didn’t want the keys; she wanted the click. I built a board focused entirely on hardware, and it remains the best thing I ever did for her hand-eye coordination. I skipped the plastic junk and went straight to the hardware store for real metal latches, slide bolts, and light switches.
You want to mount these onto a sturdy piece of sanded plywood. I’ve found that using flimsy cardboard or foam board is a total waste of time because a determined two-year-old will rip a door-bolt right out of the paper. Use real screws and make sure the tips don’t poke through the back. I personally love adding a simple battery-operated “tap light.” The instant gratification of hitting a button and seeing light is like magic to a toddler, and it teaches cause and effect better than any expensive “educational” toy.
One thing I discovered the hard way: avoid the chain-link door guards. Maya managed to get her finger looped in one during a particularly vigorous play session, and the resulting meltdown was enough to make me retire that specific component. Stick to slide bolts, gate latches, and chunky cabinet handles. The weight of the metal feels “real” to them, which keeps them engaged longer than the light plastic equivalents found in toy stores.
To finish this board, I like to sand the edges until they are buttery smooth and then paint the plywood a soft, neutral color. This makes the shiny hardware pop. It’s a functional piece of “wall art” that doesn’t look like a primary-colored eyesore in your living room. When Leo moved on to this board a few years later, I added a zipper glued vertically to the side. It gave him that tactile “zip” sound he loved, and it saved my own hoodies from being constantly played with.
2. Textures of the Wild Fabric Exploration Wall
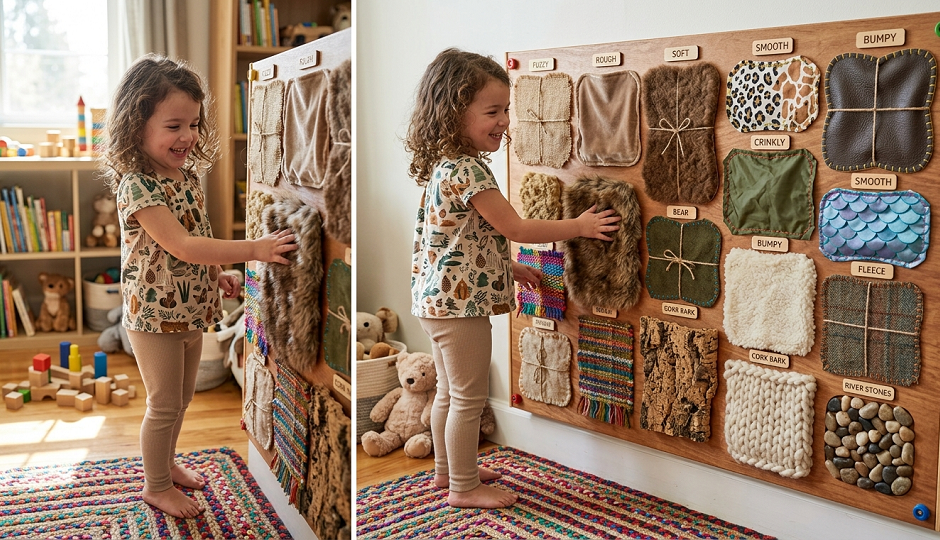
Toddlers are sensory seekers, and fabric is the easiest way to satisfy that itch. For Maya, who was my most “tactile” child, I created a grid of different fabric squares. I didn’t just use cotton; I went for the extremes. I used rough burlap, silky satin, bumpy corduroy, and a very scratchy piece of sequined fabric. I’ve seen people suggest using small swatches, but I think that’s a mistake. If the square isn’t at least the size of their palm, they can’t really feel the transition between textures.
I recommend using a heavy-duty spray adhesive to mount these squares to a large frame. If you just use glue dots, the corners will peel, and your toddler will inevitably try to eat the fabric. I also like to include a “cold” texture, like a thin sheet of stainless steel or a very smooth tile, alongside a “warm” texture like faux fur. Watching them realize the difference between the temperature of materials is a joy. It builds their descriptive vocabulary before they can even form full sentences.
I’ve found that high-pile carpet samples are a goldmine for this. You can usually get them for free or very cheap at flooring stores. They provide a deep, squishy sensation that most kids find incredibly grounding. If you have a child who gets easily overstimulated, I suggest placing the “softer” fabrics at eye level. When Maya was having a rough day, she would lean her forehead against the faux fur square and just breathe. It became a self-regulation tool as much as a plaything.
A side note on maintenance: fabric gets gross. Between sticky fingers and dust, these squares will eventually look a bit sad. I’ve found that if you choose synthetic blends like polyester or nylon for the silkier parts, they wipe down much better than real silk or delicate cotton. For the burlap or rougher bits, a quick pass with a vacuum attachment once a week keeps the “lived-in” smell at bay.

3. Interactive Pipe and Ball Drop Maze
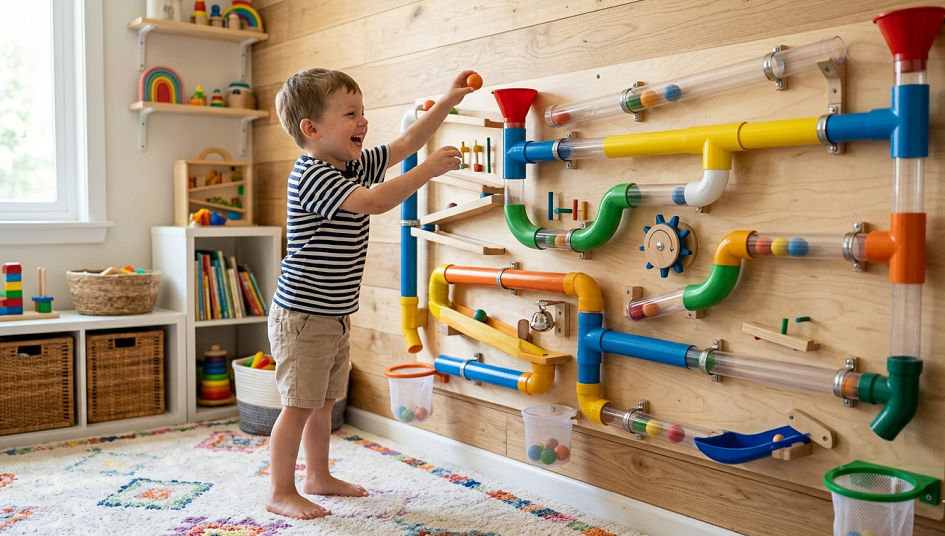
This is the project that kept Leo occupied for forty-five minutes straight—which, in toddler years, is basically a decade. You take PVC pipes or even just sturdy cardboard mailing tubes and mount them at different angles on the wall. The goal is for the child to drop a pom-pom or a ping-pong ball at the top and watch it travel through the “maze” to a basket at the bottom. I’ve seen people use paper towel rolls, but honestly, those are too flimsy. They crush the second a toddler leans on them.
I prefer clear flexible tubing if you can find it at a home improvement store. There is something mesmerizing about watching the ball travel through the tube rather than just seeing it disappear and reappear. I used zip ties to secure the tubes to a pegboard. This allows you to change the “route” of the maze whenever the kids get bored. I’ve discovered that if the maze is too simple, they lose interest in three days. If you add “diverters” or T-junctions, it becomes a puzzle they want to solve.
Don’t bother with heavy balls like marbles. They are a choking hazard and they make a racket that will give you a migraine by 10:00 AM. Large, colorful craft pom-poms are the way to go. They are silent, they come in various sizes (which teaches them which ball fits in which pipe), and they are easy to wash in a mesh bag. I once tried using golf balls because we had them lying around, but the sound of them hitting the hardwood floor at the end of the maze was like a tiny cannon going off. Stick to the soft stuff.
I also suggest placing the “collection basket” at the bottom firmly. If it’s just sitting there, it will get kicked across the room. I bolted a small plastic crate to the bottom of the wall so the balls stayed put. This teaches the “clean up” phase of the cycle naturally. Leo loved the “plop” sound the pom-poms made when they finally hit the bottom, and he would spend forever running back and forth, fetching them and starting the cycle again.
4. Vertical Magnetic Discovery Station
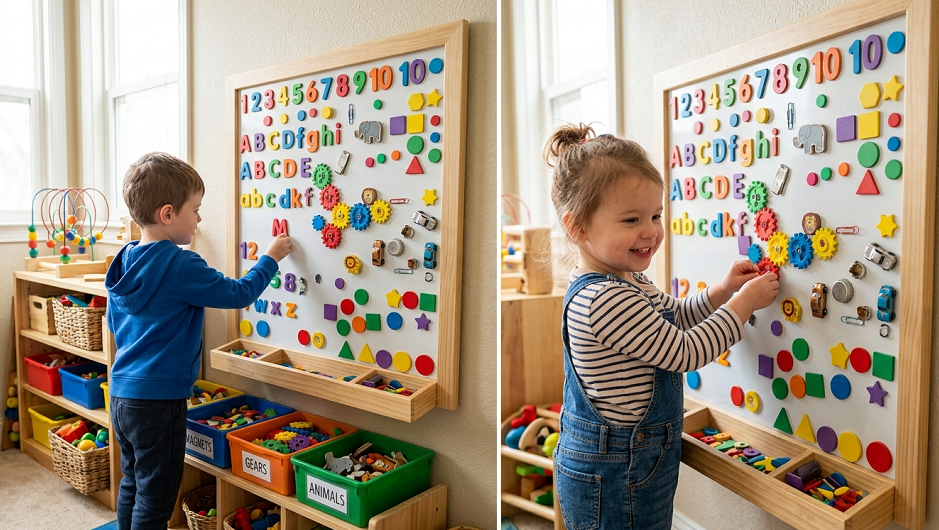
Most people stick magnets on the fridge, which is fine until you’re trying to cook dinner and there’s a small human trapped between your shins and the oven. I moved the magnets to a dedicated wall station using a large oil drip pan from an auto parts store. These pans are cheap, large, and perfectly magnetic. I screwed one directly into the wall studs in our playroom, and it became the “magnetic headquarters” for all three of my kids.
I’ve found that those tiny alphabet magnets are a bit of a nightmare. They are too small for clumsy toddler fingers and they get lost under the baseboards. Instead, I make my own “mega magnets.” I take large pictures of family members, laminate them, and glue a heavy-duty magnet sheet to the back. Sarah and Maya loved moving “Grandma” and “Leo” around the board. It’s a great way to help them recognize faces and names while practicing their pincer grasp.
I have discovered that using magnetic spice tins is another brilliant addition. I fill them with different items—one with dried beans, one with a bell, one with colorful sequins—and seal the lids with superglue. The kids can move the tins around, shake them to hear the different sounds, and try to stack them. It adds an auditory and weight-based element to what is usually just a visual activity.
Avoid the cheap “refrigerator” magnets that have the tiny circular magnets glued on the back. Those can pop off, and they are incredibly dangerous if swallowed. Always use full magnetic sheets or very large, integrated magnetic toys. Safety is the one area where I’m not “gentle”—I’m firm. If it can fit through a toilet paper roll, it doesn’t go on the sensory wall. My kids spent years at this station, eventually transitioning from family photos to magnetic gear sets and complex marble runs.
5. The “Waterless” Potion Station with Squishy Bags

I love the idea of messy play, but I don’t always love the reality of mopping my floors for the third time in a day. The squishy bag wall is the “clean” version of a potion station. You take heavy-duty freezer bags, fill them with hair gel, food coloring, and some glitter or small flat charms, and tape them securely to the wall. I’ve found that using painters’ tape is a waste of time; you need high-quality duct tape or even a wooden frame to hold the edges down.
For Leo, I made a “sea” bag with blue gel and small plastic fish. For the girls, we did “galaxy” bags with purple dye and silver stars. The magic happens when they push their fingers against the bag. The gel moves out of the way, the colors swirl, and the objects slide around. It’s incredibly calming. I’ve noticed that when a toddler is on the verge of a “big feeling” meltdown, the rhythmic squishing of these bags can often de-escalate the situation faster than a time-out ever could.
I have discovered the hard way that you must double-bag these. Even the “heavy duty” bags can develop a pinhole leak if a toddler decides to use their teeth or a sharp toy on it. I put the gel in one bag, seal it, and then place that bag upside down inside a second bag before taping it to the wall. This gives you a safety net. I also suggest not overfilling them. If the bag is too tight, there’s no room for the gel to move, and the pressure will cause it to pop. Aim for about one-third full.
One quick side note: if you want to get fancy, you can use oil and colored water in one bag to create a “lava lamp” effect. The way the bubbles of oil refuse to mix with the water is fascinating for them. It’s a science lesson disguised as a tactile experience. I usually swap these bags out every month or so because the gel eventually gets a bit cloudy, or the kids just want a new “theme” to explore.
6. Geometric Mirror and Reflection Gallery
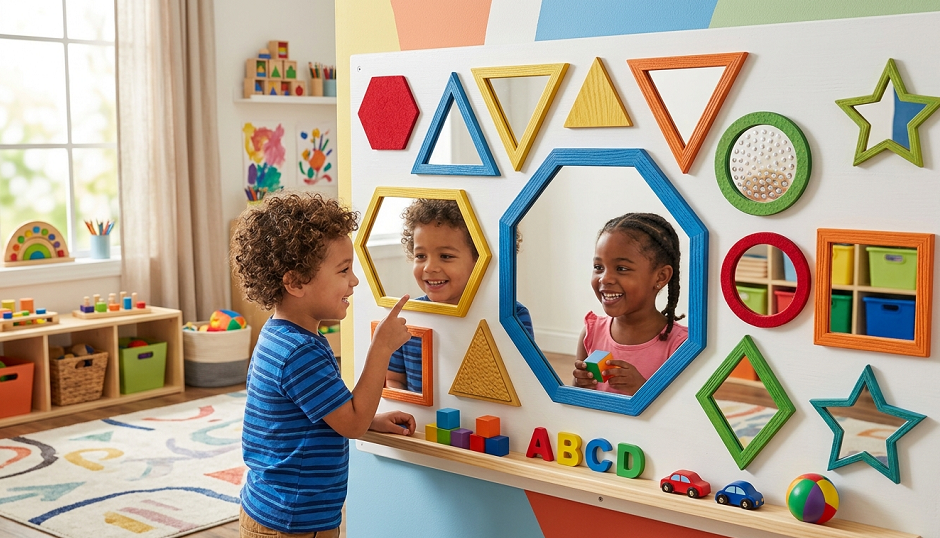
Toddlers are famously narcissistic in the cutest way possible. They love looking at themselves. When I was raising my three, I realized that a floor-length mirror was okay, but a “reflection gallery” was better. I used acrylic safety mirrors—never real glass—and cut them into different shapes like circles, triangles, and squares. I mounted them at different heights so that as the kids grew, they could see different parts of themselves.
I’ve found that adding a frame of “diffused” LED fairy lights around one of the mirrors adds a whole new layer of engagement. The way the light bounces off their faces makes them linger and experiment with facial expressions. This isn’t just vanity; it’s self-awareness. They are learning that the person in the mirror is “me.” I’ve watched Sarah spend twenty minutes just making “sad,” “happy,” and “surprised” faces at her reflection.
I have discovered that placing a “distorting” mirror—like a flexible acrylic sheet that you’ve slightly curved—is a hit once they hit age three. It’s like a mini funhouse. They laugh at their stretched-out foreheads or tiny legs. I’ve found that this kind of play encourages a healthy sense of humor and body positivity. They learn that their bodies are fun and capable, not just something they have to keep clean and dressed.
Don’t just stick the mirrors up and call it a day. I like to add “accessories” nearby. A small hook with a few old hats or a pair of oversized (lens-less) glasses can turn a sensory wall into a dramatic play station. Maya was particularly fond of a sparkly scarf I hung next to her favorite circle mirror. She would drape it over her head and “discover” herself over and over again. It’s a low-cost, high-impact addition to any playroom.
7. Natural Elements and Cedar Wood Scents
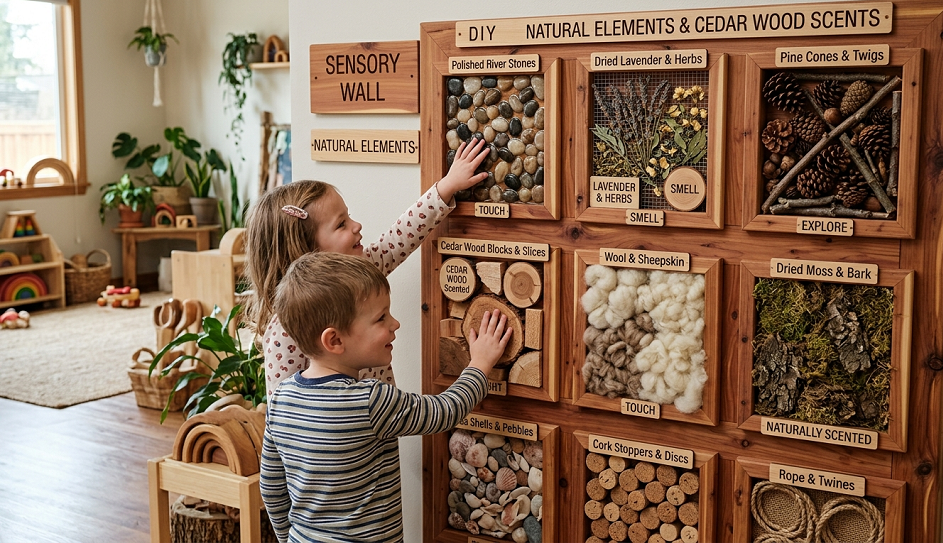
Most sensory walls focus on touch and sight, but we often forget the nose. When I was building a wall for Leo, I wanted to bring the “outside in.” I used slices of cedar wood (tree cookies), large dried cinnamon sticks (the industrial-sized ones), and even small pouches of dried lavender. I mounted these in a way that he could scratch the wood or squeeze the pouches to release the scent.
I’ve found that many “sensory” toys are made of cheap plastic that has a chemical smell. I believe that exposing kids to natural scents like wood, pine, and herbs is much more grounding. I used a strong wood glue to attach the cedar slices to a backing board. The texture of the bark is a fantastic tactile contrast to the smooth, sanded center of the wood. Leo loved tracing the rings of the tree with his fingers, which gave me a chance to talk about how things grow.
I have discovered that you have to be careful with the “scratch and sniff” aspect. Don’t use anything that can crumble easily, like dried leaves, because you’ll be vacuuming until your kids go to college. Stick to sturdy items. I once tried gluing dried orange slices to the wall, but they became a magnet for fruit flies within a week. I’ve found that using essential oils dropped onto the wooden slices is a much cleaner way to maintain the scent over time.
One quick side note: make sure the wood is properly treated so there are no splinters. I spent an afternoon with a fine-grit sandpaper making sure every edge was as smooth as a baby’s… well, you know. Natural doesn’t have to mean “rough.” The goal is to provide a variety of organic shapes that feel different from the square, plastic world of most modern toys.
8. The “Sound Wall” with Recycled Kitchenware
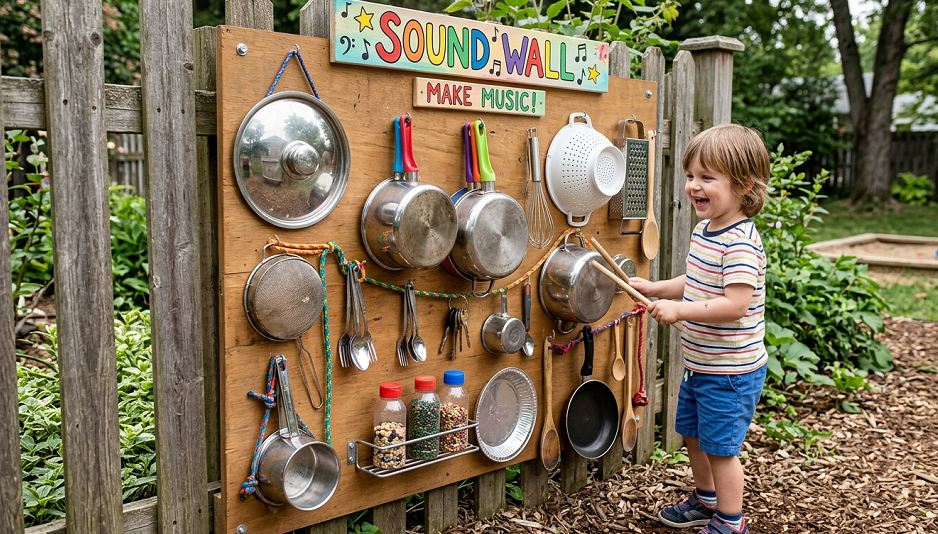
If you can handle a bit of noise, a sound wall is a toddler’s dream. I took an old metal muffin tin, a few stainless steel pot lids, and a wooden washboard and mounted them to a fence in the backyard (though you can do this inside if you have a dedicated playroom). I’ve found that providing “beaters” of different materials—a wooden spoon, a silicone spatula, and a metal whisk—teaches them about pitch and volume.
I think the biggest mistake parents make here is using things that are too loud. I’ve discovered that if you mount the metal items with a bit of felt padding behind them, it dampens the “ring” so it’s more of a “thud.” This saves your sanity while still giving the child the satisfaction of making a sound. Sarah used to “compose” entire operas on the muffin tin, and while it wasn’t exactly Mozart, her concentration was incredible.
I have discovered that adding a “rain stick” made from a clear tube filled with rice and toothpicks is a wonderful addition. I mounted it on a central pivot so the kids could spin it. The sound of the rice trickling down is a nice contrast to the “bang” of the pot lids. It provides a more melodic, soothing auditory experience. I’ve noticed that after a few minutes of loud drumming, kids often gravitate toward the rain stick to “cool down.”
Avoid using anything glass or thin ceramic for obvious reasons. I also suggest checking the “instruments” regularly for sharp edges. Metal can dent and create burrs over time if it’s being hit with a metal spoon. If I see a dent that looks suspect, I swap it out immediately. It’s a great way to recycle those old kitchen items you were going to donate anyway.
9. Zippers, Buttons, and Buckles: The Dressing Station
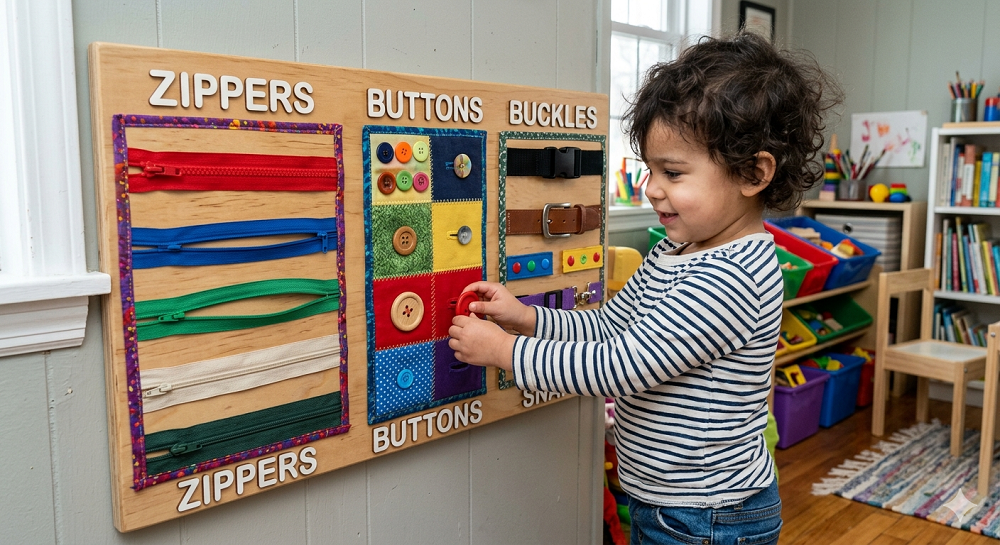
As a mother of three, I can tell you that the most frustrating part of the morning is trying to get a toddler into a car seat or a jacket when they decide they “want to do it myself” but don’t actually know how. I built a sensory wall section dedicated to the mechanics of dressing. I used old pairs of jeans and jackets, cut out the functional parts (the fly, the pocket with a button, the sleeve with a cuff), and mounted them to the wall.
I’ve found that store-bought “busy books” are often too small for frustrated little hands. On a wall, they have the leverage to really pull on a zipper or push a button. I used a heavy-duty stapler to fix the fabric to a wooden board, then covered the staples with decorative trim. I’ve discovered that starting with large, chunky zippers (like the ones on sleeping bags) is much more successful than starting with tiny dress zippers.
I have discovered that buckles are the most popular part of this board. I went to a thrift store and bought a few cheap belts and old backpacks just to salvage the plastic “click” buckles. There is a deep satisfaction in that “click” sound. Leo spent a solid week just buckling and unbuckling a plastic clip until he could do it with his eyes closed. It made the transition to the car seat much smoother because he felt like he was the master of the buckle.
Don’t bother with laces until they are much older. I tried adding a “shoe tying” section for Maya when she was two, and it just led to her getting her fingers tangled and crying. I believe in challenging them, but not frustrating them to the point of tears. Stick to things they can realistically achieve with their current level of motor skills. Buttons should be large and the buttonholes should be slightly loose. Success breeds confidence, and confidence leads to a toddler who lets you put their shoes on without a wrestling match.
10. The Vertical Chalkboard and Contact Paper Canvas
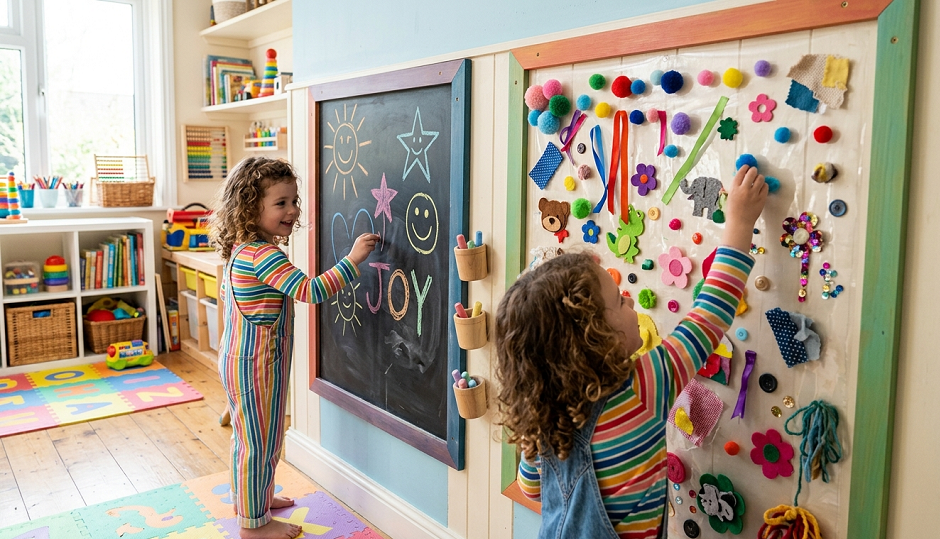
Drawing on the floor is fine, but drawing on the wall feels like “forbidden” fun. I used chalkboard paint to create a large silhouette of a house on one section of our playroom wall. I’ve found that many parents complain about the dust, but I’ve discovered that using “liquid chalk markers” is a total game-changer. They don’t create dust, the colors are vibrant, and they wipe off easily with a damp cloth.
I have discovered that a “contact paper” station is even more engaging for the younger crowd. I taped a large piece of clear contact paper to the wall, sticky side out. I gave the kids a basket of tissue paper squares, feathers, and bits of yarn. They can “stick” their art to the wall and move it around without the mess of glue or tape. It’s a temporary masterpiece that they can change every single day.
I think the key to a good vertical art station is the “border.” If you don’t define the space, your toddler will inevitably extend their masterpiece onto your actual paint. I used a thick border of colorful Washi tape to mark the “safe zone.” I told my kids, “The art stays inside the tape,” and for the most part, they listened. It’s about setting those firm boundaries with a soft heart—I want them to be creative, but I also want my security deposit back.
A side note on the contact paper: it loses its “stick” after a few days of dust and cat hair getting on it. I’ve found that replacing it once a week is necessary. But for that week, it’s the most used part of the wall. Sarah used to make “stained glass” windows by layering the tissue paper, and the way the light hit it from the nearby window was genuinely beautiful.
11. Hidden Door and Peek-a-Boo Windows
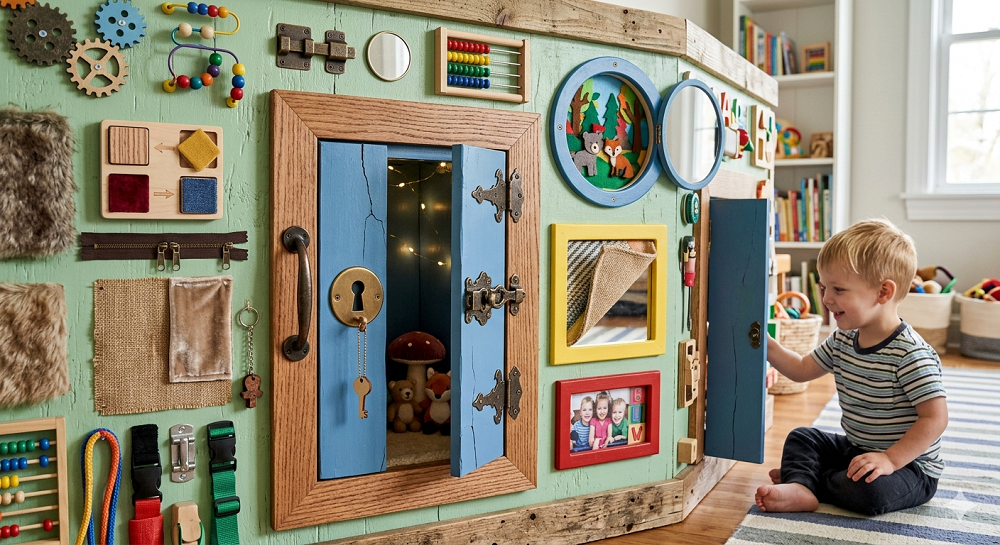
Toddlers love the concept of “object permanence”—the idea that things exist even when you can’t see them. I built a series of “windows” on the sensory wall using old cabinet doors I found at a construction surplus store. Behind each door, I put something different. One had a mirror, one had a family photo, and one had a piece of high-texture fabric like green “grass” carpet.
I’ve found that using different types of hinges and knobs for each door adds an extra layer of difficulty. One door might have a round knob, another a lever, and another a simple hole to pull. This kept Maya engaged because she had to “solve” each door to see what was behind it. I’ve discovered that if the doors are too heavy, they can pinch little fingers, so I always use “soft close” dampers or light wooden frames.
I have discovered that putting a “surprise” behind the doors every few days keeps the magic alive. Sometimes I’d tape a piece of crinkly foil back there, or a new drawing. It became a morning ritual for Leo to go and check his “mail” behind the doors. It encourages curiosity and the idea that the world is a place full of good surprises.
One thing I’d avoid: don’t put anything “scary” or too loud behind the doors. I once put a small battery-operated bird that chirped when the door opened, and it terrified Sarah so much she wouldn’t go near that wall for a month. I learned that toddlers like to be in control of the sensory input. If they open a door and something “attacks” their ears, it breaks that trust. Keep it gentle.
12. The “Ribbon Tug” and Elastic Stretch Station
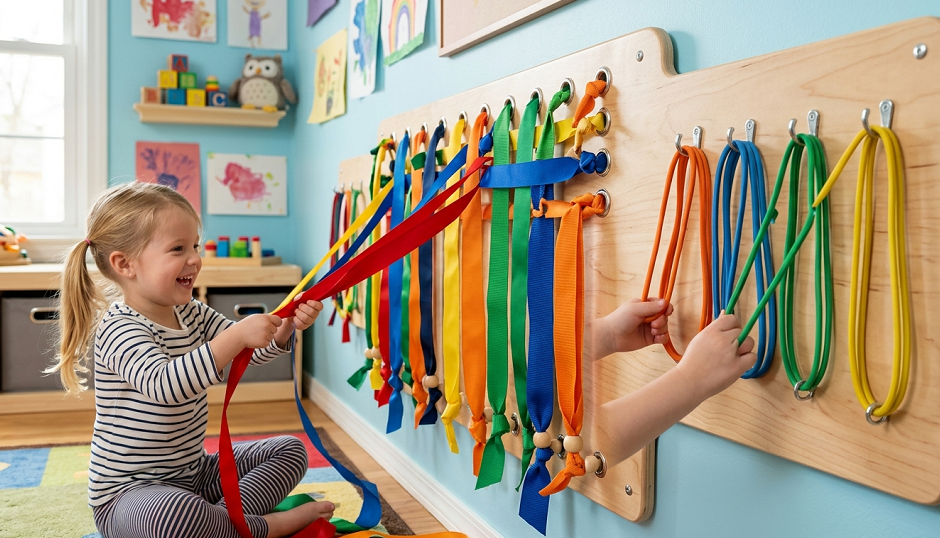
This is a great one for building shoulder strength and gross motor skills. I took a piece of pegboard and threaded various lengths of colorful ribbon, thick elastic, and bungee cords through the holes. The ends are knotted on the back so they can’t be pulled all the way through. The kids can pull the ribbon from one side to the other, or stretch the elastic and watch it snap back.
I’ve found that using different “resistances” of elastic is key. I used some very stretchy hair ties for the easy pulls and some thicker “fitness” bands for the harder pulls. This allows the child to feel the different levels of effort required. I’ve discovered that the visual of the ribbons “moving” through the board is very stimulating. It’s like a low-tech version of a screen, but it actually requires physical effort.
I have discovered that you must be very careful with the length of the ribbons. If they are too long, they can become a strangulation hazard. I keep every ribbon under six inches in length. Safety is paramount, and it’s better to have a shorter “tug” than a dangerous cord. I also make sure the knots on the back are double-knotted and reinforced with a bit of glue so they don’t slip through the pegboard holes.
One quick side note: I love using ribbons with different patterns—polka dots, stripes, and glitter. It adds a visual “clutter” that toddlers actually enjoy. They love sorting them or trying to find the “matching” ribbons on different parts of the board. It’s a simple, inexpensive addition that provides hours of pulling and stretching fun.
13. The “Color Sorting” Tube and Cup Challenge
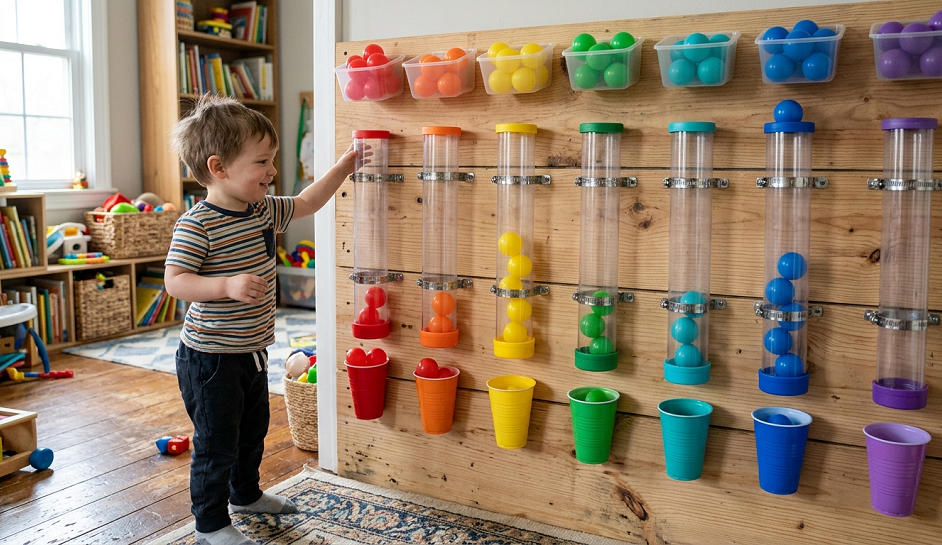
For the final idea, I focused on cognitive development. I mounted four colored plastic cups (red, blue, yellow, green) at the bottom of the wall. Above them, I mounted clear tubes that led directly into each cup. I gave the kids a bowl of colored counting bears or large wooden beads. The task was to drop the red bear into the “red” tube so it landed in the red cup.
I’ve found that this is a great way to introduce basic math and sorting concepts. I’ve discovered that if you make the tubes too vertical, the beads fly out of the cups. I angled mine slightly so the beads “rolled” into the cups with a satisfying clink. Maya was my little perfectionist, and she would spend her entire afternoon making sure every bear was in its proper “home.”
I have discovered that using “color-matched” tape on the tubes helps them if they are still learning their colors. I wrapped a piece of red electrical tape around the top of the red tube. This gives them a visual cue at the “start” of the process. I’ve found that this kind of structured play is a nice balance to the more “free-form” sensory experiences like the squishy bags or the fabric wall.
One quick side note: make sure the beads are large enough that they aren’t a choking hazard. I prefer using “jumbo” lacing beads. They are easy to grab and too big to swallow. As the kids got older, I’d time them to see how fast they could sort the whole bowl. It’s a project that grows with them, which is the hallmark of a truly great sensory wall.
Real Talk: What’s Not Worth Your Time
I’m going to be honest with you: don’t bother with anything involving loose sand or glitter on a wall. I’ve seen those “sand-filled frames” on Pinterest, and I can tell you from experience that they will leak. When they leak, you will be finding sand in your rugs for the next three years. It’s not worth the “aesthetic” look.
Also, avoid the “sticky note” wall. While it looks fun for five minutes, toddlers just rip them off and try to stick them to the dog. It’s a waste of paper and doesn’t provide enough sensory feedback to be a “long-term” solution. I’ve also found that those “water bead” bags are a disaster waiting to happen. If one of those beads escapes, it’s a major safety hazard. Stick to the hair gel—it’s safer and easier to clean up if the worst happens.
Finally, don’t feel like your wall has to look like a museum exhibit. My best sensory walls were a bit messy and made of “junk” from the garage. Your toddler doesn’t care about the color palette; they care about how it feels under their fingernails and the sound it makes when they hit it. If you spend forty hours making it “perfect,” you’ll be devastated when they inevitably try to peel the paint off the corner. Build it for them, not for your Instagram feed.
Final Thoughts
Raising Sarah, Maya, and Leo taught me that parenting is mostly just providing a safe container for their chaos. These sensory walls are that container. They allow your child to be the scientist, the musician, and the explorer they were born to be, all while you get to sit down for five minutes and drink a lukewarm tea. You aren’t “ignoring” them when they play at their wall; you are giving them the gift of independent discovery.
Every time I see a “no” coming out of my mouth, I try to think: “Where can I give them a ‘yes’?” The sensory wall is that “yes.” It’s the place where they can pull, poke, and prod to their heart’s content. You’re doing a great job, Mama. You’re learning right alongside them.
What’s the one “forbidden” thing in your house that your toddler is currently obsessed with? Maybe we can find a way to put a safe version of it on a sensory wall! Drop your stories and questions in the comments below—I’d love to help you brainstorm.