
My kitchen counter once held a half-eaten banana, three crayons, and a toddler who had just “cooked” my phone in a pot for the fourth time that week. Every parent knows this scene. You’re outnumbered, overwhelmed, and your child has decided that your belongings are the most exciting toys in the house—because the actual toys are apparently boring.
That phase with Leo nearly broke me. He was two and a half, endlessly curious, and completely uninterested in anything we’d actually bought for him. But the moment I pulled out some old cardboard and a glue stick, he was captivated. That accidental afternoon became the beginning of what I now consider one of the single best investments of my parenting years: DIY pretend play food.
I’ve been making and testing homemade play food with my three kids—Sarah, Maya, and Leo—across nearly two decades of parenting. I’ve learned what works, what falls apart in 48 hours, and what was a complete waste of a Sunday afternoon. Everything in this list is no-sew, low-cost, and genuinely toddler-approved.
Why DIY Pretend Play Food Is Worth Your Time
Before we get into the ideas, let me say this plainly: store-bought plastic play food is a total waste of money in most cases. I know that’s not what the toy aisle wants you to think, but I’ve found that the shiny, mass-produced sets get tossed aside within days. Toddlers don’t connect with things that look too “finished.” They want texture, color, and—most importantly—something they saw you make.
When kids play with food they’ve watched you create, even in the simplest way, it becomes personal. It builds vocabulary, encourages role-play, and gently introduces concepts like sharing, preparing meals, and caring for others. And none of it requires a needle, thread, or a craft degree.
Here’s what I’ve discovered works best, tested across three very different kids.
1. Cardboard Bread Loaf Slices
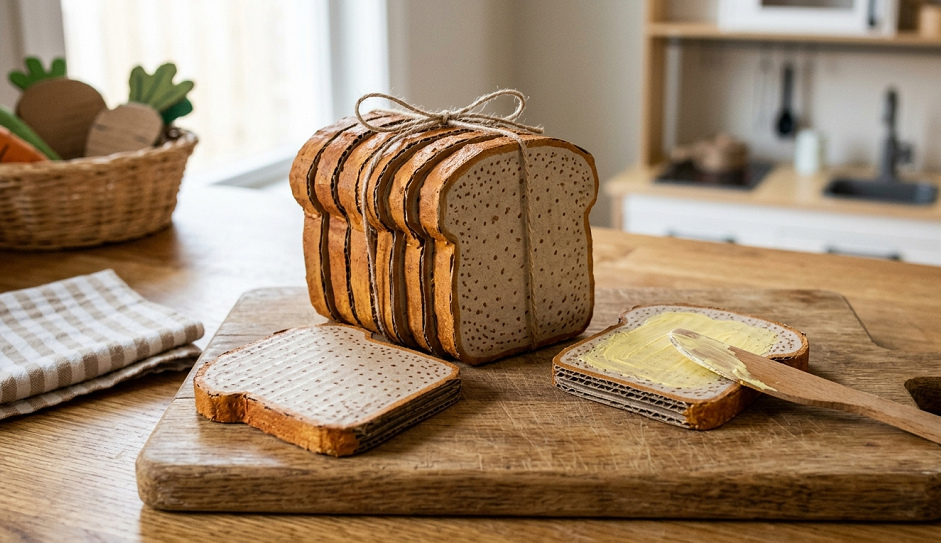
What you need: Corrugated cardboard, brown and tan paint, a marker, scissors, and white craft glue.
This is where I always start new parents. Cut your cardboard into simple bread slice shapes—think rounded square with a slightly domed top. Tear off the outer layer of one side of the corrugated cardboard to expose the ridged texture underneath. That texture alone makes it look surprisingly realistic.
Paint the crust edges in a toasty brown and the middle face in a pale tan or cream. Once dry, use a fine-tip brown marker to add tiny dots and surface details. It sounds tedious, but this takes about 20 minutes once you have your system down. I used to do this during naptime while listening to a podcast.
These slices hold up beautifully because corrugated cardboard is genuinely sturdy. Leo was dragging his “sandwiches” around in a tote bag for close to six months before they started looking worn. The best part is that toddlers can “spread butter” on them with a popsicle stick and a blob of playdough, making this one idea that connects with other play materials you likely already have.
One thing I’ll flag: don’t skip the sealant step. Once your paint is dry, brush on a thin layer of Mod Podge or a water-and-glue mixture. It protects the paint and keeps little hands from peeling everything off on day two.
2. Felt Fruits (No-Sew, Glue-Gun Method)
What you need: Felt sheets in fruit colors, a hot glue gun, scissors, fiberfill stuffing or crumpled newspaper, and a black marker.
I know “no-sew” sounds like a contradiction when felt is involved, but a hot glue gun changes everything. Cut two identical fruit shapes from felt—apples, oranges, lemons, strawberries—and hot-glue around 90% of the edges. Stuff with fiberfill or crumpled newspaper through the gap, then seal it up.
The result is a soft, squeezable piece of play food that toddlers absolutely love. There’s something about the weight and give of a stuffed felt apple that plastic simply cannot replicate. Maya was obsessed with her felt strawberry collection at age two and a half. She used to line them up by “size” for her stuffed animals.
Add details with a black fabric marker—seeds on strawberries, a stem line on an apple. For oranges, use a slightly textured orange felt if you can find it. The visual difference is small, but even toddlers notice it and love pointing it out.
One honest caveat: hot glue guns and small children do not mix. Do all of this during nap time or after bedtime. I also discovered the hard way that thin felt tears more easily than thick felt. Always go for the medium or thick weight felt sheets. The thinner ones look fine until your toddler decides to test their strength, and suddenly you’re re-stuffing a strawberry at 7 AM.
3. Salt Dough Vegetables
What you need: 2 cups flour, 1 cup salt, 1 cup water, acrylic paint, and Mod Podge.
Salt dough is one of those crafts that sounds fussier than it is. Mix the flour, salt, and water together until you get a smooth dough. Shape your vegetables—carrots, broccoli florets, corn cobs, peas in pods—and bake them at 200°F (about 93°C) for 2–3 hours, or until completely hard. Smaller pieces take less time.
Once cool and completely dry, paint them with acrylic paints. Two coats gives the best color. Seal everything with Mod Podge when dry. I’ve had salt dough vegetables last for years in our house. Sarah’s set from when she was three made it all the way through Maya’s toddler years.
The reason I love this one so much is the learning opportunity during the making. Even a two-year-old can help shape simple balls of dough into “peas.” You don’t need them to be perfect. Lumpy, wobbly carrots are often more charming anyway. The process of making the food together gives the play food meaning before it’s even baked.
One word of warning: do not rush the drying process. I tried shortcutting once by cranking the oven temperature higher, and my beautiful little corn cobs puffed up and cracked. Low and slow is the only way to go with salt dough. Also, if you’re anywhere humid, seal the finished pieces well, because salt dough will absorb moisture from the air over time.
4. Paper Mache Eggs
What you need: Balloons (small, water balloon size), newspaper strips, flour-and-water paste, white paint, and a carton from your recycling bin.
Blow up small balloons to egg size, coat them in papier-mâché strips using a basic flour-water paste, and let them dry for 24 hours. Pop the balloon once the shell is fully dry and hard. Paint white, add speckles in brown if you want a more realistic look, and nestle them into a repurposed egg carton.
The egg carton container is half the magic here. Toddlers are obsessed with opening and closing it, taking the eggs in and out, “counting” them, and pretending to crack them. Leo used to walk around with his egg carton tucked under his arm like he was heading to market. The role-play this sparks is remarkable for something made out of newspaper and paste.
This project does require two days because of the drying time, so plan accordingly. I usually start on a Friday evening so the eggs are ready for the weekend. Three layers of papier-mâché is the sweet spot—enough to be sturdy, not so thick that the egg looks like a boulder.
5. Cardboard Pizza Slices
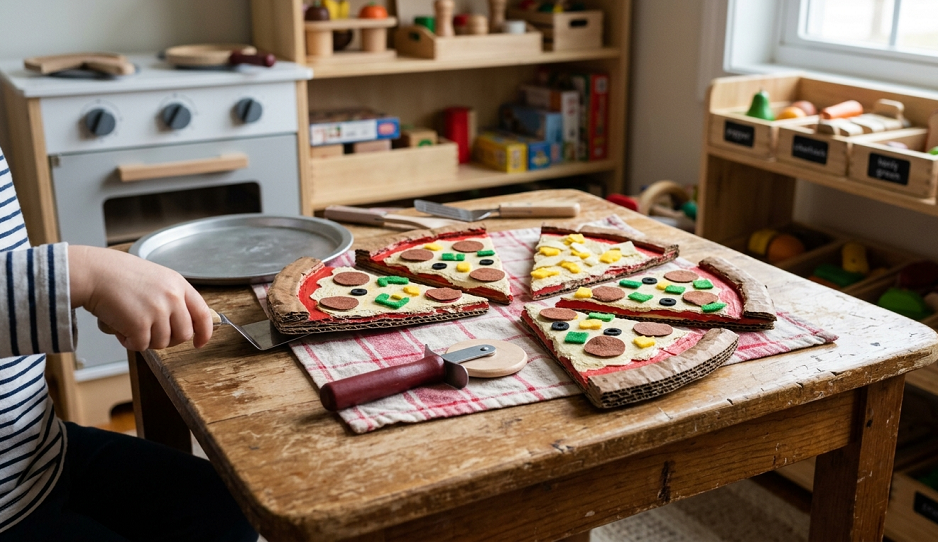
What you need: Cardboard, acrylic paint in red, yellow, and beige, a sponge or foam brush, and Mod Podge.
Cut a large circle from cardboard and divide it into 6–8 slices. Paint the base a golden beige for the crust. Use a sponge to stipple red “sauce” in the middle, leaving a crust border. Then sponge on yellow for cheese, and cut small felt or foam circles in red for pepperoni.
Glue your toppings down and seal the whole slice with Mod Podge. You can also leave toppings unglued for an interactive version where toddlers can add and remove their own toppings—a move I discovered completely by accident when Maya kept picking the pepperoni off. I decided to lean into it and made a whole separate topping set she could mix and match.
Pizza play food is especially good for encouraging language. The toppings become conversation starters: “Do you want more cheese? Which slice is the biggest? Can you give me two pieces?” These tiny conversations are doing serious developmental lifting under the surface.
6. Sponge Cake Slices
What you need: Kitchen sponges (the rectangular ones), acrylic paint, foam, and a hot glue gun.
This is one of my favorites because it takes under 15 minutes and looks genuinely adorable. Take a rectangular kitchen sponge and cut it diagonally to make a “cake slice” wedge shape. Paint it in layers—beige for the cake, pink or white for the frosting on top. Add a thin layer of red paint dragged with a toothpick for strawberry jam filling between two sponge layers glued together.
The sponge texture genuinely looks like soft cake. Hot-glue a small felt “cherry” on top and you’re done. This was one of those projects Sarah and I stumbled on during a boring afternoon, and it became a staple in every play kitchen we set up afterward.
I will be honest with you: the paint on sponges can crack if toddlers squeeze them aggressively. Once you know your child is a sponge-squeezer, seal these with a generous amount of Mod Podge first, then paint on top. It stiffens the sponge slightly but dramatically increases the lifespan.
7. Foam Sheet Sushi Rolls
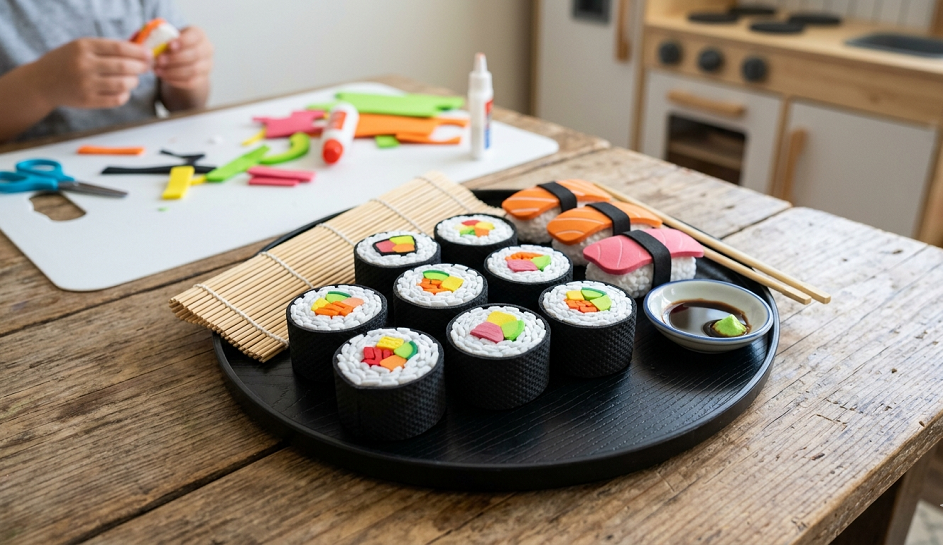
What you need: White and black foam sheets, small squares of colored foam (for fillings), a hot glue gun, and scissors.
Cut white foam into small rectangles. Wrap a strip of black foam around the outside to simulate nori. Add a tiny sliver of orange, yellow, or pink foam in the center for “fish” or “egg.” Glue it all together. That’s it. You have a sushi roll that will survive years of play kitchen action.
This one is particularly brilliant for kids in multicultural households or families who want to expose their toddlers to diverse food cultures in a playful, low-pressure way. Sarah grew up asking for “sushi” at her play restaurant and didn’t even know it was a stretch goal when she actually tried it at age six.
Foam sheets are forgiving, easy to cut with regular scissors, and available at any dollar store. Make a whole tray of them—rolls, nigiri, maki. A little dollar store tray or piece of cardboard painted dark becomes an instant sushi restaurant setup.
8. Paper Cup Noodle Bowls
What you need: Paper cups, yellow or white yarn, scissors, hot glue, and acrylic paint.
Paint the inside of a paper cup to look like broth—brown, red, or pale yellow. Cut yarn into uneven lengths (about 2–4 inches each) and bunch them together. Hot-glue the yarn bundle inside the cup so it spills over slightly like noodles. Add small felt pieces for “toppings”—a white circle for an egg, green strips for scallions.
The resulting noodle bowl is charming, lightweight, and small enough for little hands to carry around during pretend restaurant play. Leo had a whole “ramen shop” setup on his bedroom floor for about three months, and this noodle bowl was the centerpiece of every order.
One tip: use a jumbo paper cup rather than a regular one. The wider opening shows off the noodles better, and there’s more room to add toppings. It also sits more stably on play kitchen counters without tipping over mid-game, which matters more than you’d think when a toddler is taking a play food order very seriously.
9. Cardboard Box Cereal
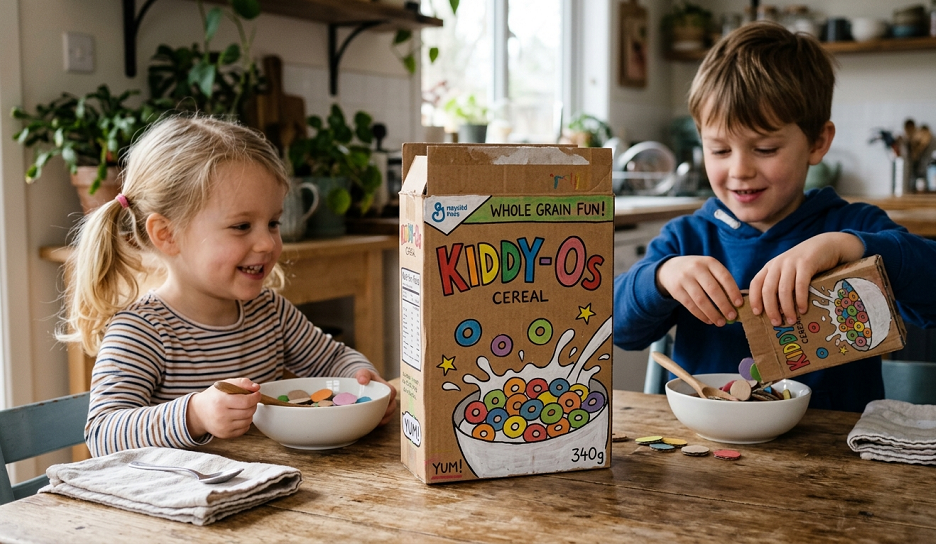
What you need: A small cardboard box (think tea bag box or playing card box), colored paper or paint, markers, and a handful of small colored pom-poms or beads in a zip-lock bag.
Design a mini cereal box—let your creativity run loose here. Draw a silly character on the front, write a made-up cereal name (“Leo’s Loops” was our household favorite), and decorate the sides. Glue or tape a small zip-lock bag of colorful pom-poms to represent the cereal inside.
The box alone becomes a prop. Toddlers love pretending to pour from it, read it, and set it on the table during a play breakfast setup. This is one of those ideas that makes the whole play scenario richer because it’s a familiar, real-world item they recognize from life.
I’ve discovered the hard way that loose pom-poms are a choking hazard for children under three. Always seal the pom-poms in a bag and tape it shut inside the box rather than letting them loose. If your child is younger, skip the pom-poms entirely and just use the box as a prop.
10. Foam Sheet Cookies
What you need: Tan or brown foam sheets, a cookie cutter as a tracing template, scissors, markers or paint, and glitter glue (optional).
Trace cookie cutter shapes onto foam sheets and cut them out. A double layer glued together gives more realistic thickness. Use brown marker or paint to add chocolate chip dots, icing lines in white paint, or sprinkles drawn in bright colors. Add a dab of glitter glue for “sugar sparkle” if your toddler is a fan.
These are incredibly durable and nearly impossible to damage. Maya’s foam cookie set survived being washed, stepped on, thrown across a room, and packed into a suitcase for a trip. They still looked fine. That kind of resilience matters when you’re making play food for a toddler who treats everything like a stress test.
Stack them in a small dollar store tin or on a little plate for a “bakery” setup. This works especially well for play birthday scenarios—toddlers can “serve” cookies to guests and practice their counting at the same time.
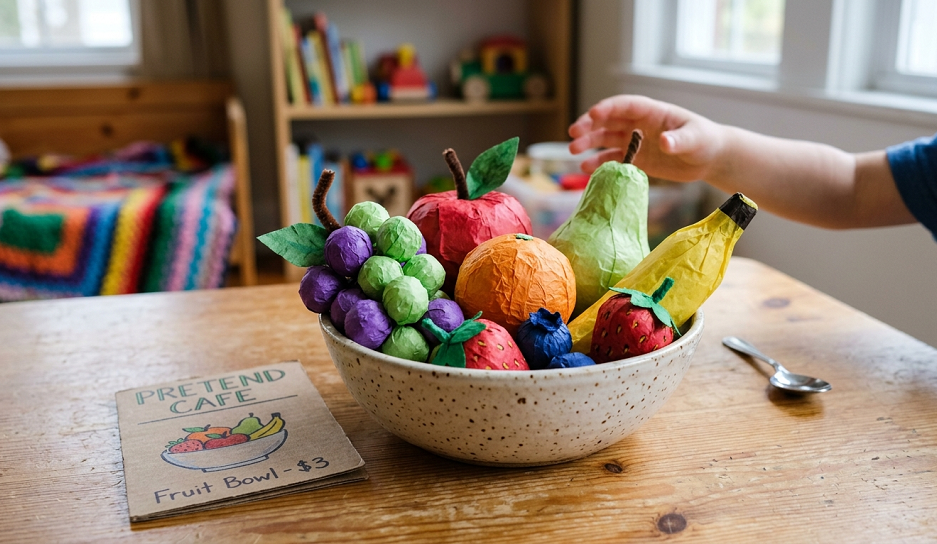
11. Tissue Paper Fruit Bowl

What you need: Tissue paper in fruit colors, newspaper for stuffing, twist ties or rubber bands, and a bowl or basket.
Scrunch tissue paper around a core of stuffed newspaper to create rough fruit shapes—hold the base with a twist tie or rubber band. Green tissue layered under orange makes a mandarin with a leaf. Red layered with a pinched top makes a rough apple. These don’t need to be precise at all.
The beauty of tissue paper fruit is that it’s the most tactile DIY play food on this list. The crinkle texture, the light weight, and the brilliant colors make it extremely engaging for sensory-driven toddlers. It’s also the quickest to make—a full fruit bowl takes about 25 minutes.
Yes, they’re more fragile than the other options on this list. Yes, your child will probably crumple one by the end of the first week. That’s okay. Make extras. The whole point is that these take minutes to replace, and the process of making them together is part of the joy.
12. Painted Rock Donuts
What you need: Smooth, round flat stones, acrylic paint, and Mod Podge.
Find stones that are roughly circular and relatively flat—riverbeds and garden centers are both good sources. Paint them in donut base colors: tan, brown, golden beige. Once dry, paint a “ring” of white or colored “icing” around the center top. Add tiny dot “sprinkles” in bright colors. Seal with two coats of Mod Podge.
Rock donuts are weighty, wonderfully textured, and completely indestructible. They’re the only play food item in this entire list that I can genuinely promise will outlast your child’s toddler years. Sarah’s set is currently sitting in a box in my attic and still looks perfect.
The satisfying heft of these little painted rocks makes them feel special in a way that cardboard and foam simply don’t. They’re particularly good for children who prefer heavier, more “real-feeling” objects in their sensory play.
13. Paper Plate Pancakes
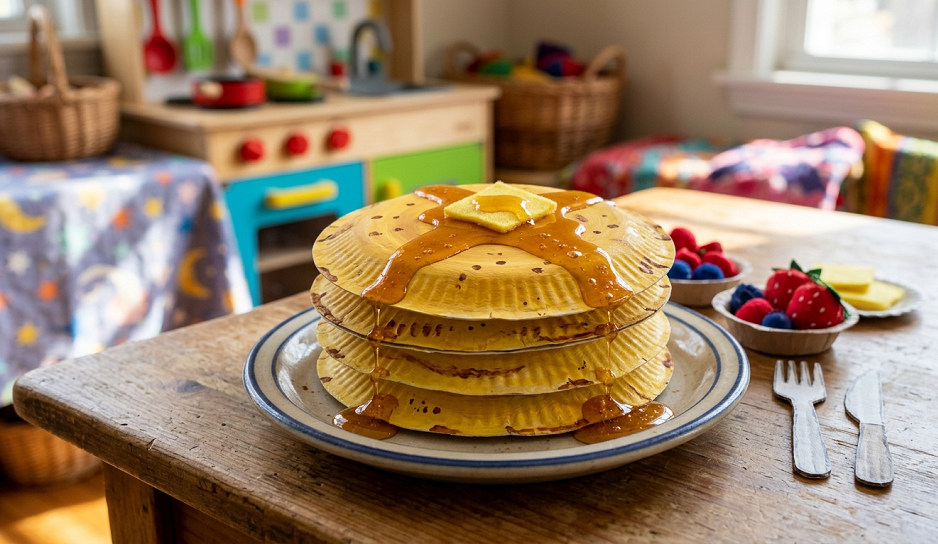
What you need: Paper plates (uncoated works best), tan and golden-brown paint, a sponge for stippling, and a small bottle or pitcher made from a cardboard tube.
Cut paper plates down to slightly smaller, irregular circles—pancakes aren’t perfect. Layer two or three together, slightly offset. Use a sponge to stipple graduated shades of tan and golden brown, darkest at the edges to simulate cooking. Paint or cut a small cardboard tube as a “syrup bottle.”
These are the easiest, fastest, and most kid-friendly item to make on this entire list. Leo helped make his set when he was barely two—he stippled the paint himself, and the results were genuinely charming. The irregularity made them look more real, not less.
Set up a play breakfast station with these pancakes, some felt fruit from idea #2, and the cereal box from idea #9, and you have a complete toddler breakfast restaurant that cost you less than $5 to create.
Real Talk: What’s Not Worth the Effort
I have to be straight with you about a few things.
Air-dry clay is overrated for play food. Every parenting blog loves to recommend it, and I tried it with all three of my kids at various points. It cracks. It chips. It crumbles when dropped. The finished pieces feel fragile in a way that stresses everyone out—including you—when your toddler inevitably hurls a clay tomato at the floor. Save air-dry clay for art projects. Salt dough (idea #3) does the same job with far better durability.
Overly detailed projects backfire. I spent an entire nap time once carefully crafting an elaborate felt sushi boat for Maya. Full decoration, multiple colors, little garnishes. She played with it for about 10 minutes before moving on to a cardboard tube she’d found. Your toddler does not need museum-quality play food. They need something they can grab, carry, pretend with, and possibly step on without causing a household crisis. Save the high-effort projects for gifts or display pieces.
Glitter. Just don’t. I know it seems fun. It is not. You will be finding glitter in your carpet, your child’s hair, and inexplicably in the bathroom for the next three years.
Parting Wisdom
Here’s the thing nobody tells you when you’re knee-deep in craft supplies and a toddler who has already lost interest and wandered off to unroll the toilet paper: the process is the point.
You are not trying to make perfect play food. You are showing your child that imagination has no prerequisites. That a cardboard circle can be a pancake. That a painted rock can be a donut. That the best toys are often the ones made at the kitchen table with someone who loves them.
Every single item on this list is forgiving. None of it needs to be perfect. None of it needs a sewing machine, a craft room, or a Pinterest-level aesthetic. It just needs you, a little time, and the willingness to make something imperfect together.
You are not failing. You are figuring it out—and that, I promise you, is exactly what good parenting looks like.
Which of these ideas are you most excited to try first? Have you made DIY play food your kids are still obsessed with? Drop your experience—or your questions—in the comments below. I read every single one, and nothing makes my day more than hearing what’s working in your home kitchen-turned-play-restaurant.